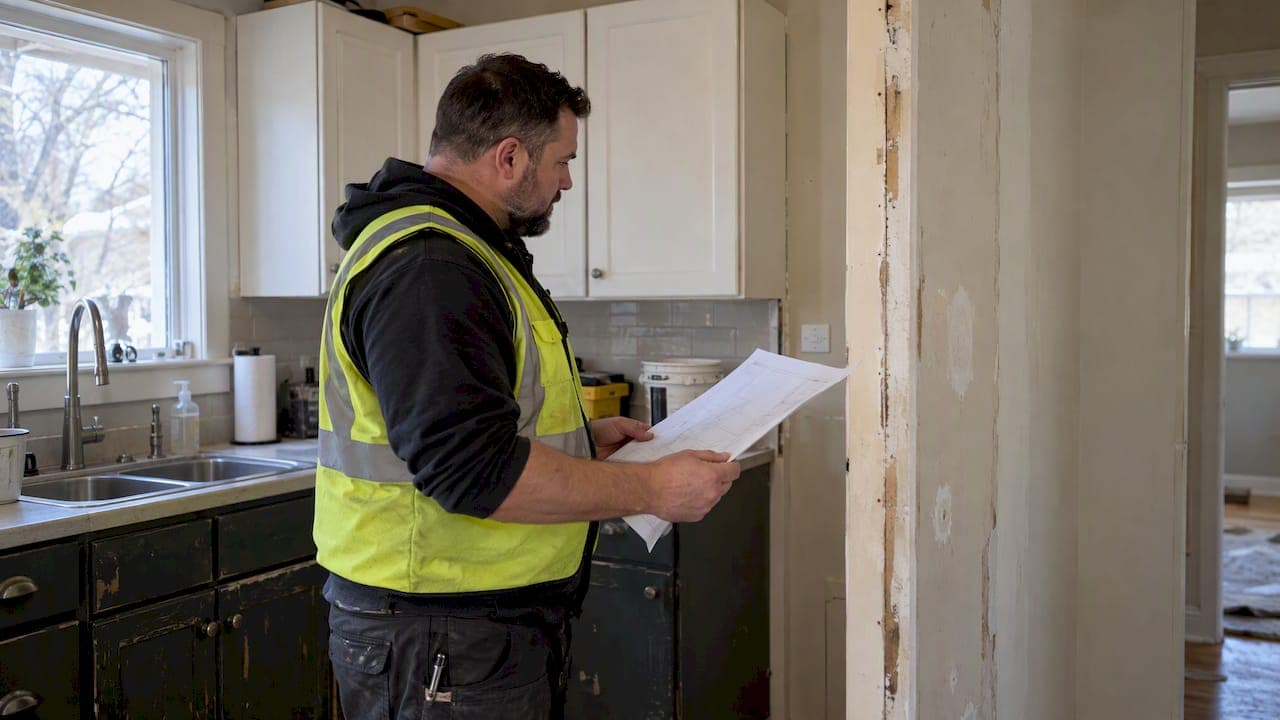
Set aside 10% to 25% of your total project cost for contingency, with the exact figure driven by your home’s age and how much of the structure gets opened up. Cosmetic refreshes sit near 10%, standard kitchen and bathroom remodels land around 15%, and older homes or gut renovations warrant 20% or more. Contingency exists to cover what nobody can see before demolition starts, not to fund upgrades you simply want.
TL;DR:
- Homes built before 1970, with visible water damage or unverified renovation history, warrant contingency budgets of 20 to 30 percent due to higher risk of unknown issues.
- For standard renovations, setting aside 15 percent for contingency is typical, but projects involving structural changes or older homes should plan for 20 percent or more.
- Homeowners should keep contingency funds in accessible, liquid accounts, and require written change orders for every draw to prevent misuse and miscommunication.
- Conducting pre-renovation inspections and detailed scope comparisons can significantly reduce unexpected costs that inflate contingency needs.
- Carefully documenting all expenses, approvals, and milestones during the project helps ensure contingency funds are used appropriately and keeps projects on budget.
Table of Contents
- What does a renovation contingency budget actually cover?
- How much contingency should you set for your project type?
- How do you calculate contingency and add it to your total budget?
- Where should you keep your contingency funds?
- How do you manage contingency money during the renovation?
- What mistakes do homeowners make with contingency (and how do you avoid them)?
- What do two real renovation budgets look like with contingency built in?
- How does contingency budgeting differ for DIY renovations versus hiring a contractor?
- How can you reduce the chances you’ll ever need contingency funds?
- When and how should you access contingency funds during unexpected issues?
- What are the most common unforeseen expenses that come up during renovations?
- Statera Contracting’s approach to contingency and budget protection
- How Statera Contracting protects your renovation budget
- Sources
What does a renovation contingency budget actually cover?
Contingency, allowances, and planned upgrades are three different pools of money, and mixing them up is where most homeowners get into trouble. An allowance is a placeholder for a cost you already know is coming (a light fixture, a faucet) but haven’t picked yet. Contingency, by contrast, is strictly reserved for unforeseen conditions and mandatory compliance work that surface only once walls or floors come open.
That protection matters because certain problems hide in plain sight until demolition day:
- Asbestos in old insulation, flooring, or vermiculite
- Outdated wiring, including knob-and-tube systems behind drywall
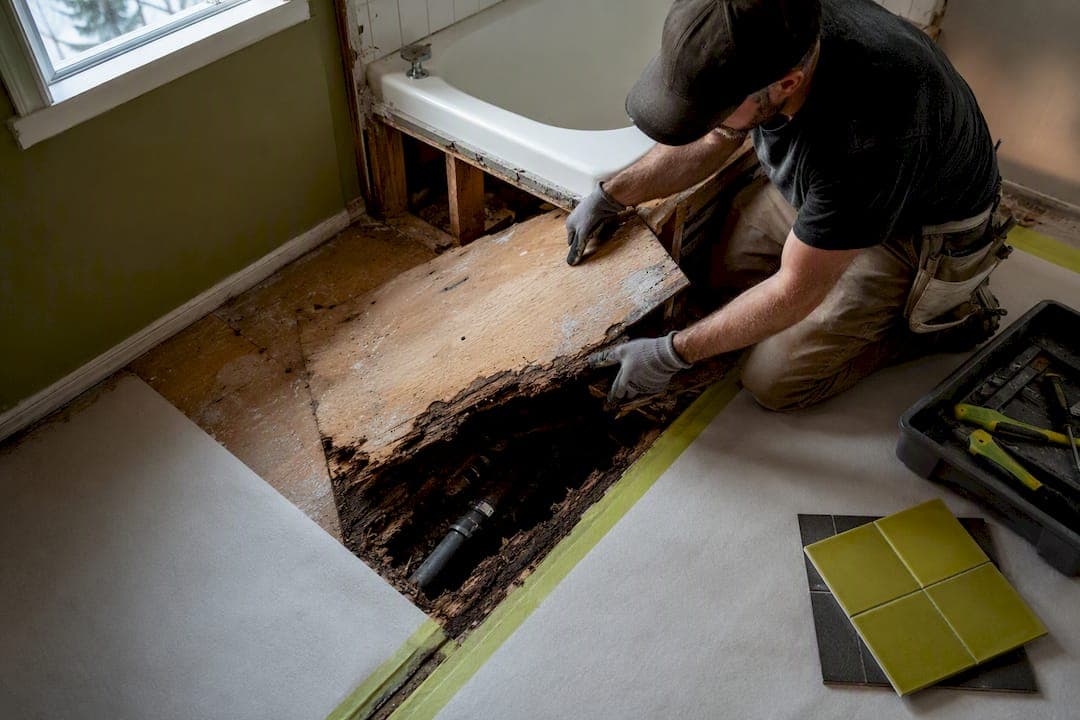
- Water damage or subfloor rot under fixtures
- Structural surprises like undersized joists or missing headers
- Code-triggered upgrades a permit inspector requires mid-project
Without contingency, any one of these can pause your crew mid-job while you scramble for financing.
How much contingency should you set for your project type?
Home age and project scope are the two biggest levers for choosing your percentage. General guidance is to set aside 10% for cosmetic projects, 15% for most mid-range renovations, and 20% or more for older homes or gut renovations, but a few risk signals should push you toward the higher end even within those categories.
Watch for a home built before 1970, any visible water staining or musty smells near exterior walls, and renovation history you can’t verify (a previous owner’s DIY electrical work is a common culprit). Each of those raises the odds of an expensive surprise once demolition starts, and pre-1970 homes frequently need remediation for exactly this reason.
| Project type | Typical contingency |
|---|---|
| Cosmetic updates (paint, fixtures, flooring swap) | 10% |
| Kitchen or bathroom remodel, standard scope | 15% |
| Structural changes or layout reconfiguration | 20% |
| Older home, heritage property, or full gut renovation | 20% to 30% |
If your project spans two rows, in a kitchen remodel that also moves a load-bearing wall, budget toward the higher figure.
How do you calculate contingency and add it to your total budget?
Calculating contingency is a straightforward add-on once you have real numbers to work with, not a guess pulled from thin air.
- Get a detailed scope of work and at least two or three contractor quotes based on that same scope.
- Separate fixed costs (labour, materials already specified) from allowances (fixtures, finishes not yet chosen).
- Add your fixed costs and allowances together to get the base estimated total.
- Apply your chosen contingency percentage to that base total.
- Add the two figures for your final planning number.
Here’s the math on a $60,000 kitchen remodel at 15% contingency: $60,000 plus $9,000 equals a $69,000 total you should have accessible before signing anything.
Pro Tip: Confirm with your contractor whether quoted prices include GST/HST. Some quotes list pre-tax subtotals, and forgetting to apply tax to your contingency calculation as well as your base cost is a common way homeowners underestimate their real total.
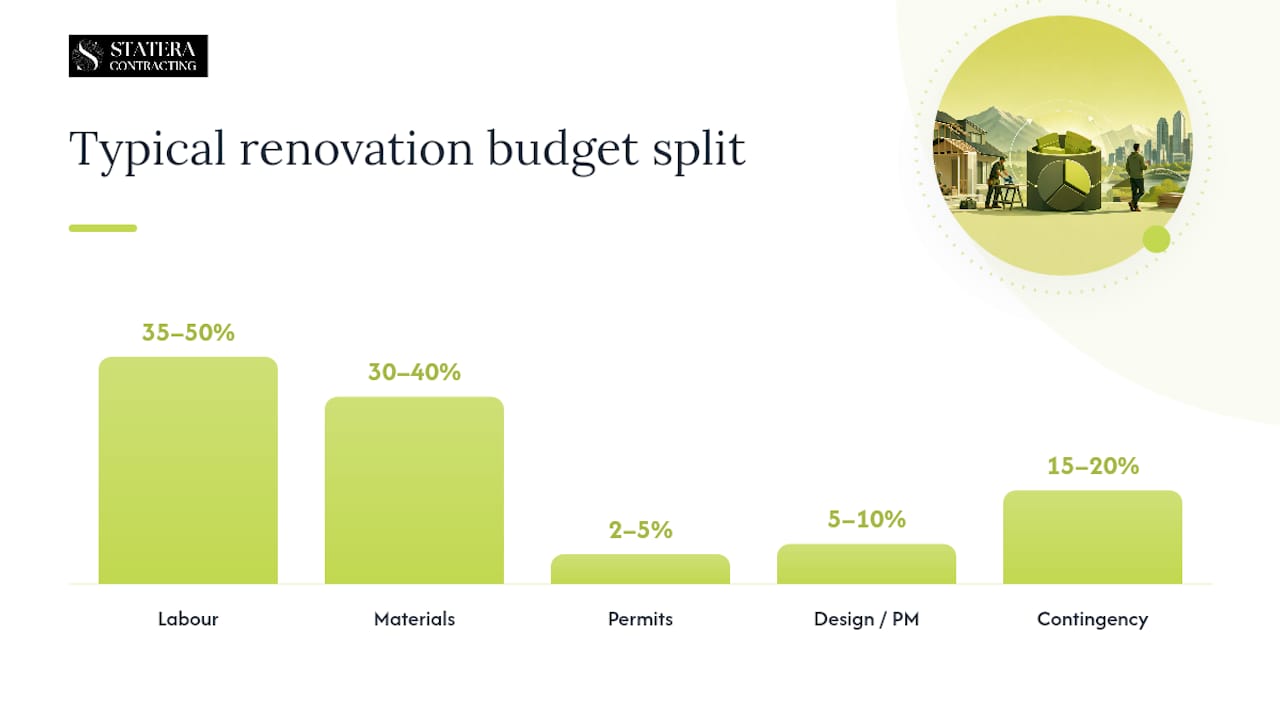
For context on where that 15% sits within a full budget, a typical renovation budget splits roughly labour 35% to 50%, materials 30% to 40%, permits 2% to 5%, design or project management 5% to 10%, and contingency 15% to 20%.
Where should you keep your contingency funds?
Contingency only works if it’s accessible the moment you need it, and a credit card at 20% interest is the worst possible place to store an emergency fund. Establishing the contingency as a separate, liquid account before demolition begins means funds move quickly and your crew doesn’t sit idle while you sort out financing.
Your options each come with trade-offs:
- Dedicated savings account: fastest access, no interest cost, but ties up cash you can’t use elsewhere.
- HELOC (home equity line of credit): flexible draws and often lower rates than personal credit, but requires equity and adds a variable-rate cost.
- Refinance or cash-out mortgage: useful for larger gut renovations, but comes with closing costs and resets your mortgage term.
A construction holdback, the portion your contractor’s payment schedule withholds until work passes inspection, protects you against poor workmanship, but it isn’t the same as common construction financing mistakes to avoid as contingency. Holdback money belongs to your contractor once conditions are met; contingency stays yours to control, which is why homeowner-held funds move faster than routing everything through a lender’s disbursement process.
Pro Tip: Avoid financing your contingency reserve on a credit card as a “backup” plan. If you never draw on it, fine, but if you do, the interest can eat the very savings the contingency was meant to protect.
How do you manage contingency money during the renovation?
Contingency stays useful only when there are rules around who can spend it and when. Loose access turns a safety net into a slush fund fast.
- Require a written change order for every contingency draw, describing the issue, the cost, and who approved it.
- Name one decision maker (you, or you and your partner) who signs off before work proceeds on any change.
- Reassess remaining contingency at three natural checkpoints: after demolition, after rough-ins, and after inspection.
- Keep a running log of allowances spent, change orders approved, and contingency used, updated weekly.
- Share that log with your contractor so both sides see the same numbers.
Professional renovators recommend these milestone-based reassessments because risk changes shape as the project progresses; the unknowns behind a wall are very different from the unknowns under a slab. Statera Contracting’s guide to change orders during a renovation walks through what a properly documented approval should include before you sign one.
What mistakes do homeowners make with contingency (and how do you avoid them)?
The same handful of errors show up on nearly every over-budget renovation, and skipping contingency altogether, underestimating labour, forgetting tax and permits, and letting scope creep in top the list.
- Treating contingency as a wish-list fund. Fix: keep it in a separate account with written approval rules, not something you dip into for upgraded tile.
- Forgetting permits, taxes, and lead times. Fix: confirm permit requirements early and build tax into your base estimate, not just your contingency.
- Choosing the cheapest quote without matching scope. Fix: compare quotes line by line, not just the bottom number, since a lower bid often means less detail, not less cost.
- Ordering custom items late. Fix: lock in lead times for cabinets, windows, and fixtures before demolition, so rush fees never eat into contingency.
What do two real renovation budgets look like with contingency built in?
Example A: small bathroom refresh. A $15,000 base scope (new tile, vanity, fixtures, no layout change) at 15% contingency adds $2,250, for a $17,250 total. Typical draws: unexpected subfloor rot under the tub, or a shutoff valve that needs replacing before new plumbing connects.
Typical draws include knob-and-tube wiring discovered behind drywall, or an inspector requiring a panel upgrade.
Statera Contracting’s Calgary renovation cost guide breaks down base costs by project type if you want to build your own version of this table.
How does contingency budgeting differ for DIY renovations versus hiring a contractor?
DIY renovations generally require a larger contingency than contracted work because contractors’ detailed scopes and inspections reduce surprises before work begins, whereas DIYers often encounter issues unexpectedly that increase costs mid-project.
DIY projects also carry a hidden cost that contractor-managed jobs don’t: your own time. If a hidden issue means a specialty trade (electrician, plumber) has to be brought in mid-project, you’re now coordinating a subcontractor with no existing relationship or negotiated rate, often at a premium for a small, urgent job. A general contractor managing the same discovery typically has trades on standing arrangements and can absorb the surprise into the existing schedule with less disruption.
The permit side compounds this gap. DIYers frequently underestimate how permits and municipal code upgrades triggered by inspections can expand project scope well beyond the original plan, partly because a homeowner pulling their own permit hasn’t seen dozens of past inspections and doesn’t know what an inspector is likely to flag. Even fixed-price professional contracts don’t eliminate this risk since change orders and hidden site conditions remain the primary causes of overruns regardless of who holds the tools. The practical takeaway: DIYers should generally add three to five percentage points to whatever contingency range fits their project type, and budget extra time alongside extra money.
How can you reduce the chances you’ll ever need contingency funds?
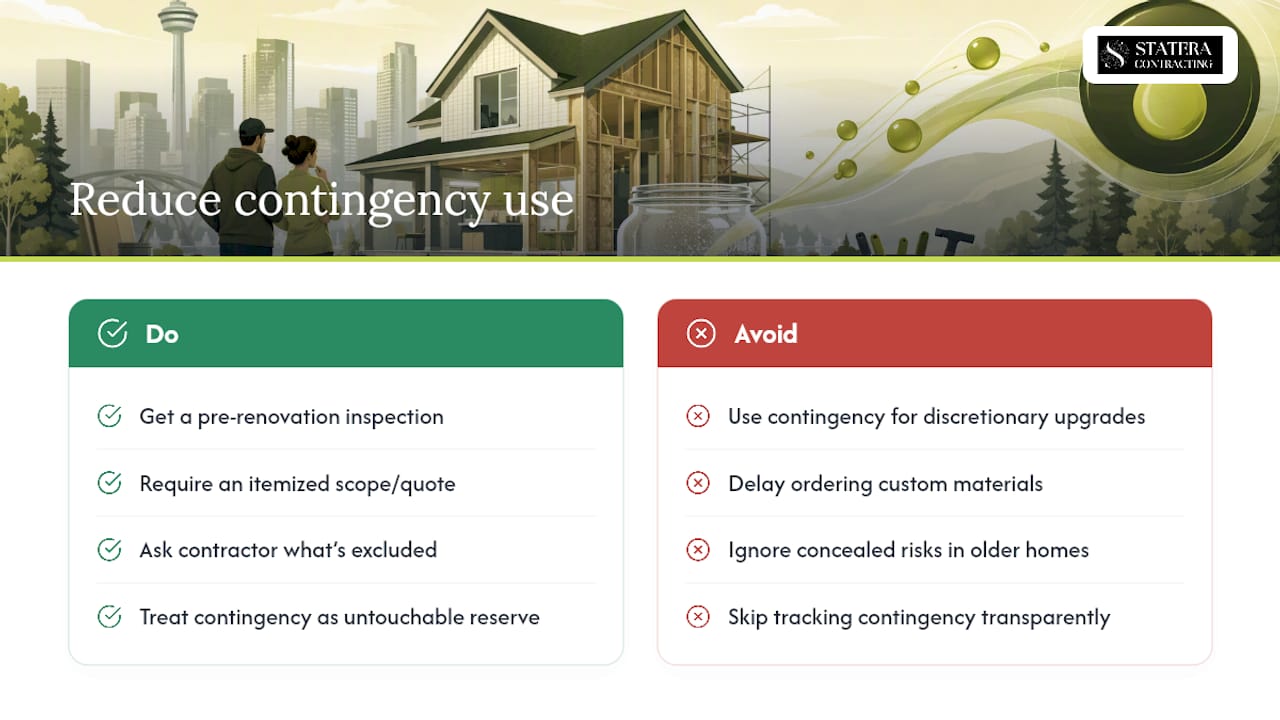
The single best lever you have is information gathered before demolition, not during it. A pre-renovation inspection, even a basic one focused on wiring, plumbing, and structural framing, turns unknowns into knowns while they’re still cheap to plan around instead of expensive to react to.
Detailed scopes of work matter just as much. A quote that says “renovate kitchen” tells you nothing; a quote that itemizes every material, finish, and labour line lets you spot gaps before signing, not after the invoice arrives. Ask your contractor directly what’s excluded from the quote, since exclusions are where surprise costs tend to hide.
Older homes deserve extra diligence specifically around concealed damage. Statera Contracting’s guide on renovating an older home covers the remediation issues, from asbestos to outdated electrical panels, that tend to surface once walls open up in a pre-1970 property.
Timing your material orders also protects your budget indirectly. Locking in custom cabinetry, windows, or tile early avoids the rush fees and substitute-material costs that eat into contingency when a supply delay threatens your schedule. And a practical mental trick from the industry: budget the base scope as if contingency doesn’t exist at all, treating your reserve as untouchable unless a genuine unforeseen issue arises. That mindset alone stops contingency from quietly becoming a second discretionary budget for upgrades you didn’t originally plan.
None of this eliminates risk entirely. Even fixed-price contracts don’t remove variability from hidden conditions, and a robust contingency doesn’t encourage waste when it’s tracked transparently and reserved for documented items only. Preparation shrinks how often you need the fund. It doesn’t replace having one.
When and how should you access contingency funds during unexpected issues?
Contingency should never be spent on impulse, even when the issue in front of you looks urgent. The right process is the same every time: identify the issue, get it documented in writing, confirm the cost, get sign-off from your named decision maker, then release the funds.
A documented change order is non-negotiable here. It should describe exactly what was found (say, rotted subfloor under a shower pan), what fixing it requires, and the added cost, with both you and your contractor signing before work proceeds. Skipping this step is how homeowners end up disputing invoices months later with no record of what was agreed to.
Timing matters too. Some issues are genuinely urgent (active water intrusion, exposed wiring) and need same-day approval to keep the project moving. Others, like a cosmetic upgrade dressed up as a “necessity,” can wait for your weekly review. Treat urgency as a filter: if pausing work for 48 hours creates a bigger problem or added cost, approve fast; if it doesn’t, take the time to confirm the change order is accurate.
Your milestone checkpoints (after demolition, after rough-ins, after inspection) are also natural moments to formally release or hold back contingency. If you’re past rough-ins with minimal draws so far, that’s useful information about how much cushion remains for the finishing stages, where change orders tend to cluster around fixture and finish substitutions.
What are the most common unforeseen expenses that come up during renovations?
Certain surprises show up so often across renovation projects that they’re barely surprises to experienced contractors, even though they always are to homeowners seeing them for the first time.
Hidden water damage tops the list, usually discovered when a vanity, tub surround, or exterior wall comes down and reveals rot that’s been spreading unseen for years. Electrical surprises follow close behind: knob-and-tube wiring in a home that supposedly had it “all replaced,” or a panel that can’t handle a new circuit without a costly upgrade. Plumbing behind walls often turns out to be galvanized steel rather than copper, adding replacement cost that wasn’t part of the original scope.
Structural issues round out the big three. What looks like a simple wall removal can reveal that the wall is load-bearing, requiring an engineered beam and permit review that a cosmetic-only quote never anticipated. Permit-driven scope expansion deserves its own mention here too: an inspector reviewing an electrical panel might flag an unrelated code violation elsewhere in the home, and by law, that fix often has to happen before the permit closes.
Smaller but frequent costs include debris disposal running higher than expected on demolition-heavy jobs, since hauling volume is easy to underestimate until the dumpster fills faster than planned. Material price fluctuations between quote and purchase, particularly on lumber and specialty tile, can also nudge a budget upward even when nothing about the scope changes.
Statera Contracting’s approach to contingency and budget protection
Patrick has spent years walking Calgary homeowners through exactly this math, and the pattern is consistent: projects with a clearly separated contingency and a documented change-order process finish closer to budget than those without one. Statera Contracting builds detailed scopes upfront and requires written approval on every contingency draw, so clients always know what’s been spent and why. Change orders get logged the same way every time, and our Calgary renovation cost guide reflects real project numbers, not estimates pulled from a spreadsheet.
— Patrick
How Statera Contracting protects your renovation budget
If you’re planning a kitchen, bathroom, basement, or home addition, the biggest budget risk isn’t the renovation itself, it’s an unclear scope that leaves contingency guessing what it’s for. Statera Contracting builds detailed, line-item scopes before any demolition starts, so allowances, fixed costs, and contingency stay separate from day one, and every change order gets documented in writing with your sign-off before work proceeds.

Whether you’re planning a full kitchen remodel or a smaller bathroom refresh, our team walks through the base scope, likely risk factors for your home’s age, and a realistic contingency range before you sign anything. Start with a look at our kitchen renovation services in Calgary to see how a properly scoped project comes together, or reach out for a quote on your specific renovation.
Sources
- How to Build a Renovation Budget in Canada (Free Planner + Template) — RenoPlanner
- Home renovation budget guide — WealthNorth